This post describes an approach to thinking about scales that I developed to overcome some challenges I faced in my own guitar playing. I call it the concept of Note Neighborhoods. The goal is to provide an easier way to memorize and work with scale fingering patterns for improvisation. If you’re a string player looking to strengthen your technical foundation for improvisation, I hope the approach will be helpful to you, and I’d like your feedback.
In this post I won’t spend much time on background. I’ll assume you’re already familiar with the idea of learning the modes of a scale to build fluency in that scale; for example, you’ve seen how the fingering patterns for the Major modes (Dorian, Mixolydian, Phrygian, etc.) can help you improvise in Major all over the fingerboard. In fact, you should understand how all the patterns can be used together when you’re improvising in any given mode. Each modal fingering pattern supplies a pool of available notes starting from a certain lowest note; it’s phrasing, not fingering, that determines the tonal center and hence what modal sound we hear. (I could use a D Dorian fingering pattern to play phrases in D Dorian, or I could use it to supply a set of notes from which I’ll build C Major/Ionian phrases.) This much should make sense to you for the rest of the post to be readable, though I’ll be happy to post more background material on request. You’ll be particularly interested in this post if you’ve spent time learning modal patterns and been frustrated by the amount of memorization involved.
The idea of Note Neigbhorhoods occurred to me when I began working with the Jazz Melodic Minor scale. I had just spent months practicing various fingerings of all the Major modes, and now it seemed like I’d need to do it all over again, learning the 7 modes of Melodic Minor in different fingerings. As I started on this path I found the fingering patterns for Melodic Minor were harder to memorize than the Major modes because they weren’t as symmetric. I was looking for a way to make the process of learning them easier.
My idea was to consider each of the 7 scale degrees, not as the starting place for a modal fingering pattern, but as the center of a fingering pattern. And instead of memorizing patterns that span all 6 strings, I decided to work with smaller patterns–three-note-per-string patterns that span three strings. In each pattern, there is a center note surrounded by one neighbor in each physical direction on the fingerboard: N, S, E, W, NW, NE, SW, SE. For example, here is what I call the “neighborhood” of 1 in C Melodic Minor:

And here is the neighborhood of 2, or D, in C Melodic Minor:

The neighborhoods of 3, 4, 5, 6, and 7 should be easy to work out from these examples. The idea behind this approach is to memorize all 7 neighborhood patterns and be able to apply them anywhere you happen to be on the fingerboard. The ultimate test is that you should be able to take any note on the fingerboard and treat it as an arbitrary degree in some given scale, seeing the neighborhood that would surround that note given that designated function. So, for example, I might tell you to play a D at the fifth fret, and then I tell you “Treat that D as degree 6 of some Melodic Minor scale.” (Note that I don’t tell you the root of the scale–I just tell you “D, degree 6, Melodic Minor.") You should be able to remember the pattern for the “Neighborhood 6” and play these notes around the D:
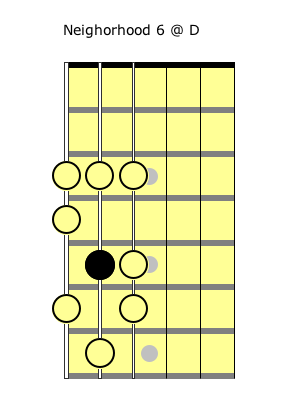
It so happens that if D is degree 6 in a Melodic Minor scale, the scale must be rooted at F, but you don’t need to think of the scale root to play Neighborhood 6 around the D.
Once you are familiar with the Neighborhoods 1 through 7, you can connect them to navigate around the fingerboard. Whatever note you happen to be playing right now, think of it as the center of a neighborhood and use your knowledge of that neighborhood pattern to give you the 8 notes in its physical proximity, spanning a 3 string region with 3 notes per string, and spanning the intervals of 5th above and a 5th below the given note. To do this, of course, you do need to be aware of the scale degree of any note you’re playing so you can apply the corresponding neighborhood pattern.
A major goal of this approach is to make memorization easier by breaking the task into 7 small “chunks” of 9 notes each, and the idea is that these neighborhood patterns can be reused across the fingerboard, no matter where the scale is rooted.
Unfortunately there’s a catch: if you’re playing in standard tuning, you’ll need to learn three fingering versions for each Neighborhood: one fingering can be used across string sets {6,5,4} and {5,4,3}, but you’ll need another for {4,3,2} and another for {3,2,1}. That’s because the major third between strings 2 and 3 breaks the symmetry of the fingerboard. There are three approaches you could try here:
- Memorize all 7 x 3 = 21 patterns.
- Memorize 7 patterns for string sets {6,5,4} and {5,4,3} and apply a “shift” on the fly whenever you’re playing on one of the upper string sets
- Use an all-fourths tuning (EADGCF), where everything is symmetric and the patterns will be the same on all string sets
Notice that you can reuse these neighborhood patterns to play in any mode of Melodic Minor. If you’re playing in Mode 2 for example, you’d use the Neighborhood 2 that we saw above as your Neighborhood 1, and all the other Neighborhood indices would be shifted accordingly. And of course the idea of Neighborhoods can be used in Major, Harmonic Minor, or any other scale system you want to explore.
If you experiment with it, I think you’ll find that it has pros and cons like any approach. For me, one of the biggest advantages, aside from smaller chunks to memorize, is simply that it’s more intuitive for me to think of fingering patterns in terms of their centers rather than their starting points. One disadvantage is this approach doesn’t lend itself to long runs. You can piece the neighborhoods together to play a long run, but you’d have to practice to build speed–it won’t come for free just by practicing the Neighborhood patterns individually.
I’d like to conclude with one other “selling point” for this approach. One of my frustrations with scale practice is that there’s a lot of work to do that feels very guitar-specific and doesn’t seem to reinforce a broader knowledge of music theory. I want to be learning about music as I study guitar. I like thinking in terms of Note Neighborhoods because it helps build a general understanding of the intervallic structure of a scale and its modes, and that knowledge can be used anywhere.
Here’s what I mean. One way to think of a Neighborhood is that it gives you all the “intervals” up to a 5th, above and below the center note. Let’s return to Neighborhood 1 @ C and break it down in terms of intervals:

In looking at the Neighborhood pattern on the fretboard, you can see what qualities the intervals have. You might know, off the top of your head that the fourths above and below 1 in Melodic Minor are both perfect fourths (and this is clear in the Fourths diagram above, where you can see the fourths above and below the center note are all on the same fret). But what about the fourths above and below 7 in Melodic Minor? If you’ve memorized Neighborhood 7 (noticed I’ve centered it at C# here but the pattern looks the same anywhere)…
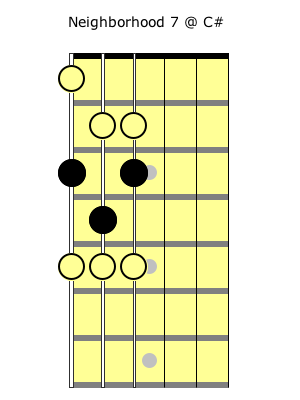
…you can see there’s an augmented fourth below 7, and a diminished fourth above!
The table below is another way of representing all the information in the 7 Neighborhoods. Each row represents a scale degree. Each column represents an interval type. Each cell contains the qualities of the interval, in Melodic Minor, if you take that interval below/above the given scale degree. So, “AP” in the cell for 7/Fourths tells you that the fourth below degree 7 is Augmented and the fourth above is Perfect. [Key: M=major, m=minor, A=augmented, P=perfect.]
| Seconds below/above | Thirds below/above | Fourths below/above | Fifths below/above | |
| 1 (root) | m/M | m/m | P/P | P/P |
| 2 | M/m | m/m | P/P | P/P |
| 3 | m/M | m/M | D/A | D/A |
| 4 | M/M | m/M | P/A | D/P |
| 5 | M/M | M/M | P/P | P/P |
| 6 | M/M | M/m | A/P | P/D |
| 7 | M/m | M/m | A/D | A/D |
If this has been helpful to you in any way, please “pay me back” by leaving a comment and sharing this post. It took me a long time to arrive at this approach, and when I first ran it by my teacher, a very experienced jazz player, he encouraged me to publish it as an instructional booklet. In this post, I wanted to put the idea out in skeleton form. Maybe you’ve seen/used this concept in a different form somewhere else? Or maybe it will change the way you think of the fretboard? Please let me know.
See Note Neighborhoods II for more charts and also check out Guitar Modes Unified. ■